

how to draw a person step by step
How to Draw a Person - Life Drawing
This is your unique chance to get a lifetime university membership and a dedicated squad of art teachers.
Such unlimited personal tutoring is not available anywhere else.
Enroll in the Life Drawing University now!
Online Course
Lifetime membership
Ane-fourth dimension payment: $297 USD
ENROLL Now
Personal Tutoring Online + Online Class
Lifetime membership
Quondam payment: $997 USD
ENROLL NOW
How to Draw a Person Step by Step
Life Drawing by Vladimir London
In this video lesson, yous will discover how to draw a model standing in contrapposto with the knowledge of body anatomy and proportions. I will make this artwork on manually toned paper in pencils. Let's begin with the skeletal beefcake of the effigy in contrapposto. In a contrapposto pose, most of the figure's weight is supported by i leg. This is one of the well-nigh common standing poses in classical art. This time, the model keeps an arm on the hip and another is raised and rests on superlative of the head.
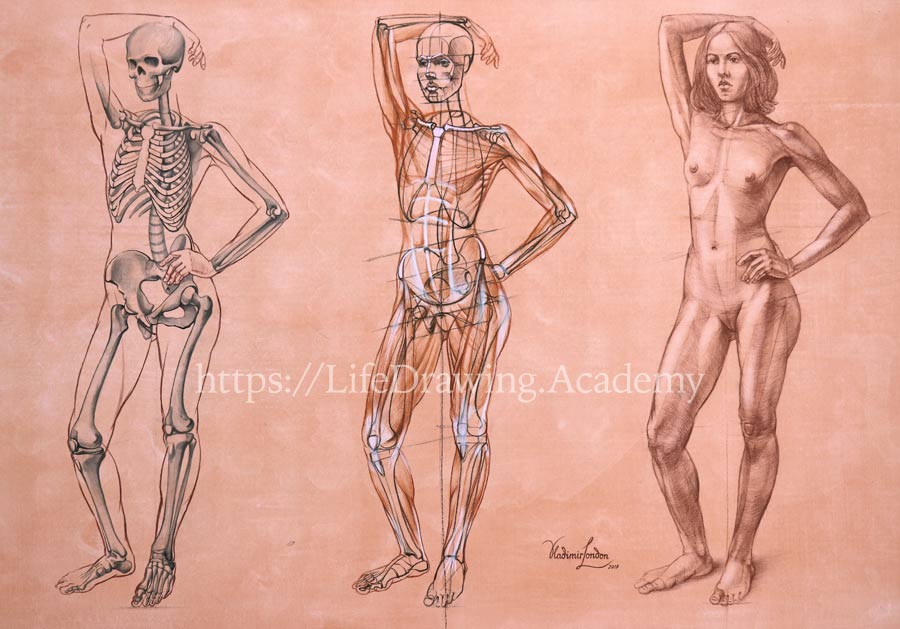
After mark the figure's top and lesser edges, I divided the figure's meridian in one-half.
The pelvis line is tilted.
The top half is halved again. And the top quarter is also divided in half.
I draw in graphite pencil and use very light pressure, so all lines are almost invisible. Exercise not worry, when it comes to important lines, I will make bolder marks so yous tin see them.
The head takes a bit more than ane-8th of the figure. In our instance, it fits seven times and a fleck in the figure's height. The face up takes five-sixths of the head height. This measurement is likewise the altitude from the middle of the figure to the pelvis' peak.
The attic'south volume is presented as a circle.
Here's how we can locate the pit of the neck. The distance from the pit of the neck to the pubic bone, which is in the middle of the figure, is comparable to the altitude from the summit of the pelvis to the top of the kneecap. It too measures from the top of the kneecap to the toes.
In previous videos, you have heard these proportions several times, and I hope past now you have memorized them and tin can employ them in life drawing.
The line between the knees follows the pelvis' tilt.
The tilt of the shoulders goes in the opposite direction to the pelvis' inclination.
The axes of legs and arms are marked every bit straight lines for at present. Their angles can be checked by measuring cross-points.
With the primary proportions in place, I created this skeleton in watercolor. Skeletal anatomy is non a part of this course. Beefcake for artists is fully explained in the Anatomy Principal Class. If you experience you accept gaps in anatomical knowledge, you lot would greatly benefit from that online video form, as it is designed for artists like you, who don't have much time for learning. I volition draw outlines of the trunk around this skeleton, and we will proceed to constructive drawing of a figure in contrapposto. This skeleton will exist used to explain the origins and insertions of muscles that influence the body's advent.
Constructive drawing will exist in the same scale as the skeletal sketch. We will repeat steps you are already familiar with. The vertical centrality is divided in half.
The pelvis' axis is tilted. The pinnacle quarter of the figure is halved, and the head takes a bit more than the pinnacle division.
The top of the confront is used to locate the meridian of the pelvis. The distance from the top of the pelvis to the toes is halved. This is the top of the kneecap.
The level of the eyes divides the caput in half. Above information technology is the level of the eyebrows. Midway from the eyebrows to the chin is the base of the olfactory organ. Thus, the face is divided into iii equal parts by the level of the eyebrows and the base of the nose.
The first pair of ribs is marked as an oval. The height of the breastbone is comparable to the face's acme.
In contrapposto, the ribcage is quite close to the pelvis' top at the compressed side of the torso. The axis of the shoulders counterpoises the tilt of pelvis. The spinal column is curved.
The axis of the forepart hip bones follows the pelvis' tilt, equally it is ane solid unit.
How to draw a pelvis and its anatomy is fully explained in the Anatomy Master Grade video lessons. The height of the pelvis is comparable to the height of a head. A pelvis is always slightly wider than the ribcage.
The hip joints' level is just above the pubic bone. The supporting leg axis spans from the hip-joint to the footprint. The thigh os has a slightly different tilt. I will describe this os. It curves slightly forward to compensate for dynamic forces during walking, running, and jumping.
The condyles of the leg bones at the knee joint are wider than the basic' shafts to reduce pressure on the articulation. At the lateral side of the shinbone, in that location is a slender calf bone, which does not take part in the knee joint joint. Its lower cease is the lateral ankle, which is lower than the medial ankle that belongs to the shinbone.
The model's left arm is in pronation. This is when the two forearm bones are crossed. The model'south correct arm is in supination. In this position, the bones are parallel to each other. The length of an elbow bone is slightly bigger than the height of a head.
I will now brand i more cartoon of the same pose...
[ The full lesson is avaibale to Life Cartoon Academy members ]
This is your unique hazard to become a lifetime academy membership and a defended team of art teachers.
Such unlimited personal tutoring is not available anywhere else.
Enroll in the Life Drawing University now!
Online Form
Lifetime membership
1-time payment: $297 USD
ENROLL At present
Personal Tutoring Online + Online Course
Lifetime membership
One-time payment: $997 USD
ENROLL NOW

Source: https://lifedrawing.academy/drawing-lessons/how-to-draw-person-step-by-step
Posted by: smithoneten.blogspot.com
0 Response to "how to draw a person step by step"
Post a Comment